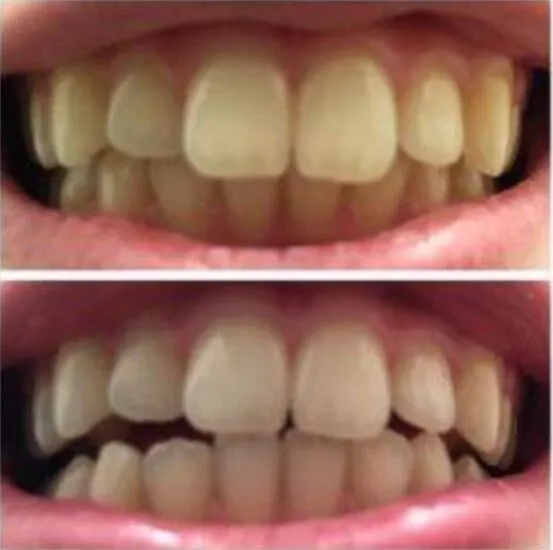
Understanding the asavea Teeth Whitening Kit
Embarking on your teeth whitening journey with the asavea kit is a straightforward process designed for at-home use. This kit provides a convenient and effective way to brighten your smile from the comfort of your home. Before you begin, it’s essential to understand what the kit entails and how it works. The asavea kit typically utilizes a combination of a whitening gel containing a bleaching agent, an LED light to accelerate the whitening process, and a mouth tray to ensure even application. The effectiveness of the kit hinges on consistent use and following the instructions meticulously. The goal is to remove stains and discoloration, revealing a noticeably whiter and more radiant smile. Proper usage is key to achieving optimal results and minimizing potential side effects.
What’s Included in the asavea Kit
A standard asavea teeth whitening kit usually contains several essential components designed to work synergistically. This typically includes the whitening gel, which is the core active ingredient. The gel contains a peroxide-based bleaching agent that penetrates the enamel to break down stains. You’ll also find a mouth tray, designed to fit comfortably over your teeth, ensuring even distribution of the gel. An LED light device is another crucial element; this light accelerates the whitening process, amplifying the effects of the gel. The kit also provides detailed instructions and a shade guide to track your progress. Some kits may include a desensitizing gel to reduce potential sensitivity and a user manual, providing step-by-step guidance on how to use the kit safely and effectively. Knowing all the contents will help you get ready.
The asavea Teeth Whitening Kit Components

Diving deeper into the components of the asavea kit, you’ll find each part plays a crucial role in the teeth whitening process. The whitening gel, usually the star of the show, is formulated with a specific concentration of a bleaching agent, such as hydrogen peroxide or carbamide peroxide. The mouth tray, often made of a flexible material, is designed to hold the gel in place and to ensure even coverage across your teeth. The LED light device emits a specific wavelength of light that activates the whitening gel, accelerating the bleaching process. Some kits also include a desensitizing gel designed to ease any sensitivity that might arise during the treatment. Carefully examine each component upon receiving the kit to familiarize yourself with everything needed and confirm that all parts are present and in good condition, before beginning the process of teeth whitening. This overview ensures that you understand each part for use and what the next steps will be.
Preparing Your Teeth for Whitening
Before you begin whitening your teeth with the asavea kit, preparing your teeth is essential for optimal results. This preparation involves several steps designed to clean the surface of your teeth and create an ideal environment for the whitening gel to work effectively. Proper preparation can also minimize potential sensitivity and ensure a more comfortable experience. Make sure you have all the kit’s components ready and accessible. It is also recommended to take a ‘before’ photo to track your progress. This allows you to compare results as you move along with the treatment. Take your time and make sure you are ready for the upcoming steps.
Brushing and Flossing Before Whitening
A thorough oral hygiene routine immediately before whitening is a crucial part of the preparation process. Begin by brushing your teeth gently with a fluoride toothpaste. This removes any surface debris, food particles, and plaque that could hinder the whitening process. Flossing is equally important; it removes any particles and debris from between your teeth and along the gumline. Doing this removes everything that could potentially block the gel from accessing the enamel and working as intended. After brushing and flossing, rinse your mouth thoroughly with water to remove any lingering toothpaste or debris. Ensure your teeth are clean and dry before proceeding with the application of the whitening gel. Avoid using mouthwash immediately before whitening, as it might interfere with the gel’s efficacy.
Applying the asavea Whitening Gel

Proper application of the asavea whitening gel is crucial for achieving the desired results. The gel is the active ingredient that will break down the stains on your teeth. Always read and follow the specific instructions provided with your asavea kit, as the application method may vary slightly. Generally, you’ll be applying the gel directly onto your teeth and then using the tray to spread it evenly. Avoid getting the gel on your gums, as it may cause irritation. The application process requires a steady hand and attention to detail to ensure that every tooth is covered.
Applying the Gel to the Tray
The correct application of the whitening gel to the tray ensures that the gel is applied evenly on the surface of your teeth. Start by examining the tray to identify the areas where the gel should be placed. Use the syringe or applicator provided with the kit to apply a small amount of gel to the inside surface of the tray, specifically where it will come into contact with your teeth. Avoid overfilling the tray, as this can lead to the gel overflowing and causing irritation. Once the gel is applied to the tray, carefully place the tray over your teeth, making sure that each tooth is covered. Ensure the tray fits comfortably and that the gel makes contact with your teeth without touching your gums excessively.
Using the LED Light Device
The LED light device in the asavea teeth whitening kit is designed to accelerate the whitening process. The light emits a specific wavelength of light that interacts with the whitening gel to boost its effectiveness. The light helps to break down stains more quickly and efficiently, leading to faster and more noticeable results. Using the LED light correctly is essential for maximizing its benefits and ensuring your safety. Make sure to read the instructions on how to operate the device correctly and ensure it is clean before use. Remember, using the LED light is a critical part of the process in achieving that brighter smile.
Activating the LED Light

Activating the LED light involves a few simple steps. After you have applied the gel to your teeth and positioned the mouth tray, the LED light device should be placed close to your mouth, usually over the tray. Ensure that the light covers all of your teeth. Most devices have an on/off button. Press the button to activate the LED light. You should feel a gentle warmth, and the light will begin to shine on your teeth. Make sure you follow the recommended session duration, which is specified in the kit’s instructions. The device will typically turn off automatically after the session is complete. Always consult the instructions for the exact operational procedures for your specific asavea kit.
Whitening Session Duration and Frequency
The duration and frequency of each whitening session are crucial for achieving optimal results with the asavea kit. The manufacturer provides guidelines, and following these is important to avoid potential side effects and ensure the effectiveness of the treatment. The session duration typically ranges from 10 to 30 minutes, depending on the kit’s formulation and the severity of the staining. Start with the shortest recommended time and gradually increase if necessary, as per the instructions. The frequency, which is how often you whiten your teeth, is also important; many kits recommend using the product once a day for a certain number of days. Do not exceed the recommended frequency, as this may lead to increased sensitivity. Always refer to the provided instructions.
Post-Whitening Care and Maintenance
After completing a whitening session with the asavea kit, proper care and maintenance are essential to ensure the longevity of your results and minimize any potential side effects. This includes rinsing your mouth, avoiding staining foods and drinks, and maintaining good oral hygiene practices. Taking care of your teeth right after the whitening process sets the stage for a beautiful and long-lasting smile. This stage is critical to protect your newly whitened teeth from external elements that could stain or impact their color.
Rinsing and Cleaning Your Mouth

After each whitening session, it’s crucial to rinse your mouth thoroughly to remove any remaining gel. Rinse with water and spit it out. It’s important to avoid swallowing any of the gel. Gently brush your teeth, but avoid brushing too vigorously, as this can cause sensitivity. You can also use a soft-bristled toothbrush and fluoride toothpaste. Clean your mouth tray to keep it sanitary for future use. Cleaning ensures there is no residue left from the previous session, so the tray stays clean and effective for future treatments. Follow the instructions provided with the kit for cleaning the tray.
Avoiding Staining Foods and Drinks
One of the most important post-whitening care steps is to avoid foods and drinks that can stain your teeth. For at least 24 to 48 hours after a whitening session, your teeth are more susceptible to staining, so it is recommended to be cautious. Common culprits include coffee, tea, red wine, dark sodas, and berries. These items contain pigments that can easily adhere to the enamel. You should also be mindful of other items like soy sauce, curry, and tomato-based sauces. If you consume these items, it is recommended to rinse your mouth with water immediately afterward to minimize staining. Adhering to this guideline will significantly help maintain your newly whitened teeth.
Maintaining Your White Smile Long-Term
Maintaining a bright, white smile after using the asavea kit requires consistent effort. Regular oral hygiene, a balanced diet, and periodic touch-up treatments can help maintain the results. Your daily oral hygiene routine is essential; this includes brushing your teeth at least twice a day with a whitening toothpaste and flossing once a day. Regular dental checkups and cleanings are also essential for removing any plaque and tartar, which can cause discoloration. Consider using a whitening toothpaste or mouthwash to help maintain brightness. Additionally, avoiding or limiting staining foods and drinks is crucial for keeping your teeth white. By following these guidelines, you can ensure your white smile lasts.
Possible Side Effects and Solutions

While the asavea teeth whitening kit is generally safe, it’s important to be aware of potential side effects and how to manage them. The most common side effects are tooth sensitivity and gingival irritation. Knowing these potential issues and how to manage them can improve your experience. Having the right information and understanding of potential problems will help you deal with them efficiently and effectively.
Sensitivity and How to Manage It
Tooth sensitivity is a common side effect of teeth whitening. It is the feeling of discomfort when your teeth are exposed to hot, cold, sweet, or acidic foods and drinks. If you experience sensitivity, there are several solutions you can try. Use a toothpaste designed for sensitive teeth, as it contains ingredients that help to block the tubules in your enamel, reducing sensitivity. Reduce the frequency or duration of your whitening sessions. You can also try using a desensitizing gel, which is often included in whitening kits. It is also important to avoid foods and drinks that trigger sensitivity. If sensitivity persists or is severe, consult your dentist.
Gingival Irritation and What to Do
Gingival irritation, or irritation of the gums, is another potential side effect of teeth whitening. This may appear as redness, swelling, or tenderness of the gums. The irritation occurs when the whitening gel comes into contact with the gums. To manage gingival irritation, make sure to carefully follow the application instructions and avoid getting the gel on your gums. If you notice irritation, stop using the kit and allow your gums to heal before resuming treatment. You can also apply a small amount of vitamin E oil to the affected areas to help soothe and heal the gums. If the irritation persists or worsens, consult your dentist.